

GCP
9 minute read
Connecting your Google Cloud project to Cloud2Gether allows the platform to discover and analyze your cloud resources, costs, and infrastructure. Cloud2Gether requires read-only access to your GCP project — it will never create, modify, or delete any resources.
The integration uses a Service Account Key (JSON) to authenticate. You create a service account in your GCP project, assign it read-only roles, generate a JSON key file, and upload it to Cloud2Gether.
Prerequisites
Before you begin, make sure you have:
- An active Google Cloud project with billing enabled
- Access to the Google Cloud Console with permissions to:
- Create service accounts (requires
iam.serviceAccounts.createpermission) - Manage IAM roles on the project (requires
resourcemanager.projects.setIamPolicypermission)
- Create service accounts (requires
- A Cloud2Gether account — sign up here if you don’t have one
Information You Will Need
At the end of this setup, you will have:
| Item | Description | Where to find |
|---|---|---|
| Account Name | A descriptive display name in Cloud2Gether | Choose your own (e.g., GCP Production) |
| Client ID | The unique numeric Client ID of your Service Account | In the JSON file ("client_id") or GCP Console |
| Service Account JSON Key | The downloaded .json key file | Generated in GCP Service Account Keys tab |
| Project ID | Your Google Cloud project identifier | In the JSON file ("project_id") or GCP Console |
Part 1 — GCP Configuration
Step 1 — Create a Service Account
A service account is a special Google account that represents your application (Cloud2Gether) rather than a person.
- Sign in to the Google Cloud Console
- Select the project you want to connect to Cloud2Gether from the project selector at the top
- Navigate to IAM & Admin → Service Accounts (or search for “Service Accounts” in the top search bar)
- Click + Create Service Account
- Fill in the service account details:
- Service account name: Enter a descriptive name, for example:
cloud2gether-readonly - Service account ID: This is auto-generated from the name (e.g.,
[email protected]) - Description (optional):
Read-only service account for Cloud2Gether integration
- Service account name: Enter a descriptive name, for example:
- Click Create and Continue
Step 2 — Grant IAM Roles
After creating the service account, you need to assign roles that grant read-only access to your project resources.
- In the Grant this service account access to project step, click + Add Another Role to add the following roles:
| Role | Purpose |
|---|---|
Viewer (roles/viewer) | Read-only access to all project resources |
Monitoring Viewer (roles/monitoring.viewer) | Access to monitoring metrics and dashboards |
- In the Select a role dropdown, search for
Viewerand select Viewer - Click + Add Another Role
- Search for
Monitoring Viewerand select Monitoring Viewer - Click Continue
The Viewer role grants read-only access to all resources in the project. This allows Cloud2Gether to discover and analyze your infrastructure without being able to modify anything. For a more granular approach, see the Custom Role section below.
- The Grant users access to this service account step is optional — you can skip it
- Click Done
Step 3 — Generate a JSON Key File
Cloud2Gether authenticates using a service account key file in JSON format.
- In the Service Accounts list, click on the service account you just created (
cloud2gether-readonly) - Go to the Keys tab
- Click Add Key → Create new key
- Select JSON as the key type
- Click Create
The JSON key file will be automatically downloaded to your computer.
Store this JSON key file securely. It contains credentials that provide access to your GCP project. If you lose this file, you can generate a new key, but the old key cannot be recovered. Never commit this file to source control or share it publicly.
The JSON key file contains all the credentials and identifiers needed for the connection:
{
  "type": "service_account",
  "project_id": "your-project-id",
  "private_key_id": "key-id",
  "private_key": "-----BEGIN PRIVATE KEY-----\n...\n-----END PRIVATE KEY-----\n",
  "client_email": "[email protected]",
  "client_id": "108234567890123456789",
  "auth_uri": "https://accounts.google.com/o/oauth2/auth",
  "token_uri": "https://oauth2.googleapis.com/token",
  "auth_provider_x509_cert_url": "https://www.googleapis.com/oauth2/v1/certs",
  "client_x509_cert_url": "https://www.googleapis.com/robot/v1/metadata/x509/cloud2gether-readonly%40your-project-id.iam.gserviceaccount.com"
}
client_id: Used in Step 2 of Cloud2Gether setup.project_id: Used in Step 4 of Cloud2Gether setup.private_key&client_email: Automatically parsed when uploading the file in Step 3.
Step 4 — Enable Required APIs (if not already enabled)
Cloud2Gether needs certain Google Cloud APIs to be enabled in your project to discover resources. Most projects have these enabled by default, but verify the following are active:
- Navigate to APIs & Services → Enabled APIs & services
- Ensure the following APIs are enabled (click + Enable APIs and Services to enable any that are missing):
| API | Purpose |
|---|---|
| Cloud Resource Manager API | Discover project and organization structure |
| Compute Engine API | Inventory compute resources |
| Cloud Monitoring API | Access monitoring data |
| Cloud Asset API | Inventory all cloud assets |
| Cloud Billing API | Access billing and cost data |
You can also enable APIs using the gcloud CLI:
gcloud services enable cloudresourcemanager.googleapis.com \
  compute.googleapis.com \
  monitoring.googleapis.com \
  cloudasset.googleapis.com \
  cloudbilling.googleapis.com \
  --project=YOUR_PROJECT_ID
Part 2 — Cloud2Gether Setup
Step 5 — Connect in Cloud2Gether
- Log in to Cloud2Gether
- In the left sidebar, click Cloud Accounts
- Click the Link account (or Add Account) button
- Select GCP (Google Cloud Platform) as the cloud provider
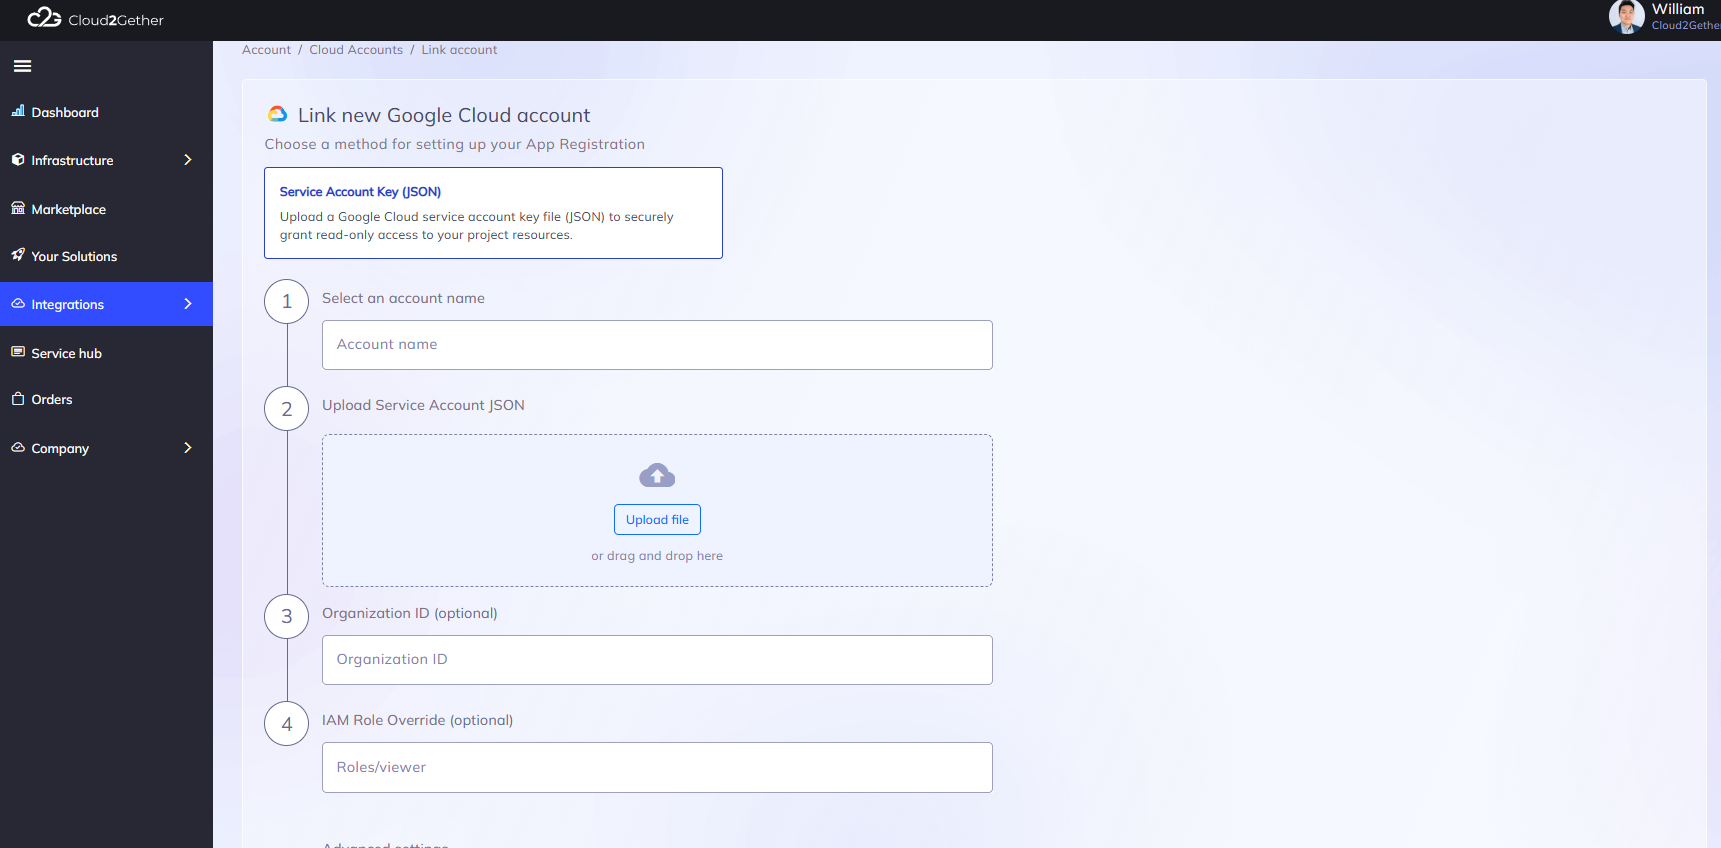
- On the Link new Google Cloud account page, ensure Service Account Key (JSON) is selected (selected by default)
You will see the 4-step connection form:
Step 6 — Enter Account Information
Follow the 4 numbered steps on the screen:
1. Select an account name
Enter a logical, descriptive name to identify this GCP project inside Cloud2Gether.
- Examples:
GCP Production,GCP Dev/Staging,Data Analytics Project
2. Client ID
Enter the Client ID associated with your Google Cloud Service Account.
- Where to find: Open your downloaded Service Account
.jsonfile and copy the numeric value from the"client_id"field (e.g.,108234567890123456789), or find the Unique ID / Client ID on the Service Account details page in the Google Cloud Console.
3. Upload Service Account JSON
Upload the Service Account JSON key file you downloaded in Step 3:
- Click the Upload file button, or drag and drop the
.jsonfile into the upload zone. - Cloud2Gether automatically validates the JSON format and extracts credentials securely.
Ensure you upload the correct .json key file. Cloud2Gether validates the JSON schema (type: "service_account", project_id, private_key_id, private_key, client_email, client_id). If the file is invalid, missing required fields, or corrupted, validation error messages will be displayed.
4. Project ID
Enter your Google Cloud Project ID (e.g., my-cloud-project-123456).
- Where to find: Copy the project ID from the
"project_id"field in your JSON key file, or from the GCP Console project selector.
Step 7 — Create Configuration
- Click Create configuration (or click Cancel if you need to discard changes).
- Cloud2Gether will validate:
- Service account key authenticity and private key signature
- Client ID and Project ID validity
- IAM permissions on the project
- API availability
- If validation succeeds, your GCP account is linked and will appear in your Cloud Accounts list.
Your GCP project is now connected. Cloud2Gether will start scanning your resources and they will appear in your dashboard within a few minutes.
Custom Role (Optional)
If your organization requires a more restrictive setup than the Viewer role, you can create a custom IAM role with only the permissions Cloud2Gether needs.
Create a Custom Role
- Navigate to IAM & Admin → Roles
- Click + Create Role
- Enter a name, for example:
Cloud2Gether Read Only - Add the following permissions at minimum:
compute.instances.list
compute.instances.get
compute.disks.list
compute.networks.list
compute.subnetworks.list
compute.firewalls.list
compute.regions.list
compute.zones.list
storage.buckets.list
resourcemanager.projects.get
monitoring.metricDescriptors.list
monitoring.timeSeries.list
cloudasset.assets.listResource
billing.accounts.list
billing.budgets.list
- Click Create
- Assign this custom role to your service account instead of the Viewer role
Managing Multiple Projects
To connect multiple GCP projects to Cloud2Gether, you have two options:
Option A — One Service Account Per Project
Create a separate service account in each project and upload each JSON key individually. This is the simplest approach and keeps permissions isolated.
Option B — Cross-Project Service Account
Use a single service account from one project and grant it access to other projects:
- Create the service account in your central/management project
- In each target project, go to IAM & Admin → IAM
- Click + Grant Access
- Enter the service account email (e.g.,
[email protected]) - Assign the Viewer and Monitoring Viewer roles
- Click Save
Then add each project as a separate cloud account in Cloud2Gether using the same JSON key.
Troubleshooting
Invalid Service Account Key or JSON Validation Errors
- Missing fields error: Ensure your JSON key file was exported directly from GCP IAM. The file must contain
"type": "service_account","project_id","private_key_id","private_key","client_email", and"client_id". - Invalid JSON syntax: Verify that the file has not been edited or truncated during download.
- Client ID mismatch: Ensure the Client ID entered in Step 2 matches the numeric
"client_id"present in the JSON file. - Project ID mismatch: Verify that the Project ID entered in Step 4 matches the
"project_id"in the JSON file and your GCP project. - Expired or revoked key: If the service account key was deleted or rotated in GCP, generate a new key in the Google Cloud Console and update your credentials.
Permission Denied Errors
- Verify the service account has the Viewer (
roles/viewer) and Monitoring Viewer (roles/monitoring.viewer) roles on the project. - Check that the roles are assigned at the project level, not just on individual resources.
- Ensure the service account belongs to (or has access to) the correct project.
API Not Enabled
- Navigate to APIs & Services → Enabled APIs & services and verify the required APIs (Cloud Resource Manager, Compute Engine, Cloud Monitoring, Cloud Asset, Cloud Billing) are enabled.
- Some APIs take a few minutes to become active after enabling.
Resources Not Appearing
- Allow a few minutes for the initial resource discovery to complete.
- Verify the project has active resources (empty projects will show no results).
- Check that the Compute Engine API and Cloud Asset API are enabled.
Security Best Practices
- Use the minimum required roles (Viewer + Monitoring Viewer) or a custom role
- Rotate service account keys periodically — Google recommends rotating keys every 90 days
- Delete unused keys — service accounts can have at most 10 keys; remove old ones
- Avoid using default service accounts (e.g., Compute Engine default service account) for integrations
- Store the JSON key file securely and never commit it to source control
- Consider using Workload Identity Federation as a keyless alternative for enhanced security
- Monitor service account activity in Cloud Audit Logs
Next Steps
After successful integration, you can:
- Explore your resources in the Resource Catalog
- Analyze infrastructure costs
- Run lock-in analysis across your multi-cloud environment
- Set up additional cloud accounts (AWS, Azure) for a unified view
Feedback
Was this page helpful?
Was this page helpful?
Let us know how we can improve